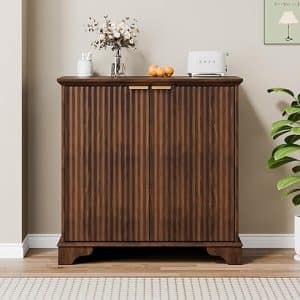
How to Paint Wood-Grain Effect Cabinets. DIY Step-by-Step Guide. Looking to elevate your kitchen or bathroom cabinets without the cost of real wood? Learning how to paint wood-grain effect cabinets is an affordable, DIY-friendly solution that adds rustic charm or sleek sophistication to any space. Whether you’re updating laminate, MDF, or painted wood surfaces, this faux finish technique can deliver eye-catching, professional-looking results.
To paint wood-grain effect cabinets, start by gathering the necessary materials, including a graining tool, wood-tone paints, and a clear glaze. First, apply a base coat in a light color. Once dry, mix a glaze with a contrasting color to achieve depth. Using the graining tool or a brush, create wood grain patterns by dragging it through the glaze. Work in small sections, blending as you go to simulate the look of real wood. Finally, seal your work with a clear topcoat for durability and a polished finish.
In this guide, we’ll show you exactly how to transform plain cabinets into stunning wood-look features using grain-painting techniques, with a list of tools, materials, and expert tips for long-lasting beauty.
What Is a Wood-Grain Paint Effect?
The wood-grain paint effect, also known as “faux bois,” is a decorative painting technique that mimics the natural texture and pattern of real wood. By using special tools like wood-graining combs or rockers, you can replicate the look of oak, walnut, mahogany, or even weathered barnwood on any smooth surface.
The wood-grain paint effect is a decorative painting technique that simulates the appearance of natural wood grain on a variety of surfaces. This effect can be achieved using various methods and materials, typically involving layering and manipulation of paint to create a realistic wood-like finish. Here are some key aspects:
Techniques
- Base Coat: A solid color base coat is applied, often a neutral or lighter shade.
- Glazing: A tinted glaze is used over the base coat. This semi-transparent layer allows the base color to show through while adding depth.
- Graining Tools: Special tools, such as brushes, combs, or sponges, are used to create the characteristic lines and swirls of wood grain.
- Finishing: A clear topcoat may be applied for protection and to enhance the sheen.
Applications
- Furniture: Enhancing the look of painted furniture to resemble wood.
- Walls: Creating an accent wall with a wood-like appearance.
- Cabinetry: Updating kitchen or bathroom cabinets without replacing them.
Benefits
- Cost-Effective: Provides the look of expensive wood without the high cost.
- Customization: Allows for a variety of colors and finishes to match any decor.
- Durability: When sealed properly, the finish can be long-lasting and resistant to wear.
This technique is popular in home decor and can be adapted for both indoor and outdoor projects.
How to paint wood-grain effect cabinets DIY
Supplies You’ll Need
Before you begin, gather the following tools and materials:
Materials:
- Primer (bonding primer for laminate or glossy surfaces)
- Base coat paint (latex or acrylic, typically in a neutral wood tone)
- Wood grain glaze (or acrylic glaze mixed with paint)
- Top coat (clear polyurethane for durability)
Tools:
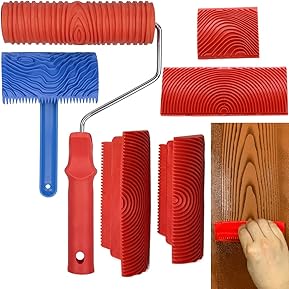
- Wood graining tool or rocker
- 2-inch angled brush
- Foam roller or paint pad
- Lint-free rags
- Painter’s tape
- Sandpaper (120- and 220-grit)
- Drop cloth or plastic sheeting
See more: best wood grain tools paint kit
Step-by-Step: How to Paint Wood-Grain Effect Cabinets
Step 1: Prep Your Cabinets
Thorough prep is crucial for a smooth, long-lasting finish.
- Remove cabinet doors and hardware.
- Clean all surfaces with a degreaser to remove oils and grime.
- Sand lightly using 120-grit sandpaper to scuff the surface.
- Wipe clean with a tack cloth.
- Tape off walls and countertops with painter’s tape and cover floors with a drop cloth.
Tip: For laminate cabinets, use a bonding primer to ensure paint adhesion.
Step 2: Apply Base Coat
Choose a base coat in a light to medium shade that will peek through the faux grain.
- Apply primer (if needed) and let it dry completely.
- Use a foam roller to apply your base coat evenly across doors, frames, and drawers.
- Allow 4–6 hours to dry, then apply a second coat if needed.
Example base coat colors: Cream, light tan, warm gray, or beige.
Step 3: Mix and Apply Glaze
This is where the magic happens! The glaze creates the visible wood grain.
- Mix 1 part paint (in a darker wood tone like walnut or espresso) with 4 parts glazing medium.
- Work in sections. Use a brush to apply a thin, even coat of glaze over one small area at a time.
Step 4: Create the Wood Grain
Immediately after applying the glaze, use your wood-graining tool to mimic real wood texture.
- Start at the top of the section and drag the tool downward while gently rocking it back and forth.
- Wipe off excess glaze from the tool after each stroke.
- Continue across all cabinet surfaces, mimicking natural wood patterns like straight grain, knots, or swirls.
Tip: Practice on cardboard first to get the hang of the rocking motion.
Step 5: Let It Dry and Touch Up
- Allow the glaze to dry for at least 24 hours. Touch up any uneven areas with a small brush or rag.
Step 6: Seal with a Top Coat
Protect your beautiful faux wood finish with a durable clear coat.
- Use a foam roller or brush to apply a clear polyurethane sealer.
- Apply 2–3 coats, letting each dry fully.
- Reattach cabinet doors and hardware after 24–48 hours.
Choose a satin or semi-gloss finish for a natural wood sheen.
Best Paint Colors for Faux Wood Cabinets
Here are a few color combinations for realistic wood finishes:
| Wood Look | Base Coat | Glaze Coat |
|---|---|---|
| Light Oak | Pale beige | Warm tan |
| Walnut | Light brown | Dark espresso |
| Weathered Gray | Pale gray | Charcoal gray |
| Mahogany | Reddish beige | Deep red-brown |
Pro Tips for Realistic Results
- Work in small sections to prevent the glaze from drying before graining.
- Use vertical strokes for cabinet doors and horizontal for drawers.
- Add knots or swirls to mimic real wood imperfections.
- Label cabinet doors before removing to keep track of placement.
- Use matte glaze for a rustic look or gloss for a modern wood finish.
Making a wood grain impression with paint and a certain tool is shown in this video:
youtube source
Why Choose the Wood-Grain Paint Effect?
Choosing the wood-grain paint effect offers several advantages:
1. Aesthetic Appeal
- Natural Look: Mimics the beauty of real wood, providing warmth and character to any space.
- Versatility: Complements various design styles, from rustic to modern.
2. Cost-Effective
- Budget-Friendly: Achieving the look of wood without the high cost of actual wood materials.
- Less Maintenance: Typically requires less upkeep compared to real wood finishes.
3. Durability
- Resistant Finishes: Many wood-grain paints are designed to withstand wear and tear, making them suitable for high-traffic areas.
4. Customization
- Color Options: Available in a wide range of colors and finishes, allowing for personalized design choices.
- Application Techniques: Various methods can be used to achieve different wood-grain effects, tailoring the look to your preference.
5. Environmentally Friendly
- Sustainable Choice: Reduces the demand for logging and contributes to more sustainable building practices.
6. Easy Application
- User-Friendly: Suitable for DIY projects, making it accessible for homeowners looking to update their spaces.
The wood-grain paint effect combines beauty, efficiency, and sustainability, making it a popular choice for enhancing the aesthetics of homes and commercial spaces alike.
Frequently Asked Questions
1. Can I use spray paint for the base coat?
- Yes, spray paint can be used, but ensure it’s suitable for the surface and provides good coverage.
2. How long does the glaze take to dry?
- Drying times can vary; refer to the product instructions. Typically, it can take a few hours to a day.
3. What if I make a mistake while glazing?
- You can often correct mistakes by wiping the area with a damp cloth before it dries.
4. Is a sealer necessary?
- While not strictly necessary, a sealer can protect your finish and enhance durability, especially in high-use areas.
5. Can I use this technique on other surfaces?
- This technique is primarily for wood or wood-like surfaces, but can be adapted for other materials with proper preparation.
6. What type of paint works best?
- Use water-based latex or acrylic paint with a glaze medium. Oil-based paints are not recommended due to odor and cleanup.
Recommended Products on Amazon
- Wood Graining Tool Set – Faux Finish Rocker Comb Kit
- General Finishes Water-Based Glaze Effects
- Zinsser BONDZ Maximum Adhesion Primer
- Minwax Polycrylic Protective Finish – Clear Satin
Final Thoughts: A Stylish DIY Upgrade
Knowing how to paint wood-grain effect cabinets gives you the power to completely transform your space on a budget. With a little patience and creativity, you can achieve a realistic wood look that enhances your kitchen, bathroom, or laundry room without replacing your existing cabinetry.
Ready to transform your cabinets with stunning faux wood grain? Try this DIY project over a weekend and enjoy the timeless charm of wood—without the hefty price tag.
Share your results or ask questions in the comments below!
See more:


